Installing Eclipse (with built-in Java and Maven)
Eclipse is an open-source development environment for, amongst others, Java projects. The Eclipse development environment is available for Windows, Mac, and Linux.
DSOL is dependent on several external libraries to function properly. The easiest way to run a DSOL program is to have Apache Maven figure out what libraries are needed to run the DSOL program. Apache Maven is a flexible and open source build tool that, amongst a large set of functions, enables programmers to automatically resolve dependencies and easily build their project. The Eclipse Java installations all contain Maven, making it really easy to set-up, develop, and run a DSOL-based simulation.
In order to start using DSOL, download and install one of the Eclipse development tools via the Eclipse installer: https://www.eclipse.org/downloads/packages/installer or more fine-grained from https://www.eclipse.org/downloads/packages/. Make sure to take a version for Java development that contains Maven for Eclipse (m2e); the "Eclipse IDE for Java Developers" is probably your best choice. If you want to choose an installation folder in Windows, you might put it in a folder for 'offline installations', such as c:\app\eclipse on Windows. Eclipse, as an offline installation, does not install as a regular program, is fully self-contained, and does not rely on the Windows registry. Create a start menu entry or a desktop shortcut for Eclipse to easily start it.
By default, Eclipse starts with a built-in Java version. If you go to the folder where Eclipse has been installed, you see an 'eclipse.ini' file. In this file, there is an indication of the Java version (the 'vm' or Virtual Machine') that is used:
-vm
plugins/org.eclipse.justj.openjdk.hotspot.jre.full.win32.x86_64_15.0.2.v20210201-0955/jre/bin
So, in this case the Java version that is used is Java version 15, built into Eclipse. This is sufficient to run. You can also install a stable, Long-Term Support (LTS) version of Java yourself -- see the following section what to do in case you want to install a version of Java yourself. If you have installed your own Java version, e.g. in C:\app\jdk17 for Windows, change the above 'vm' setting to:
-vm
C:/app/jdk17/bin
Of course it is possible to use another development environment such as Netbeans (https://netbeans.org/downloads/) instead of Eclipse, and a build manager such as Gradle (https://gradle.org/) instead of Maven. This manual, however, uses Eclipse and Maven as reference examples.
Installing Java (optional -- you can use the Eclipse version)
For Windows, install OpenJDK version 17 (a current LTS = Long Term Support version). Download the zip for Java 17 at https://jdk.java.net/archive/ for your operating system. You can install a later version of Java, but the current version of DSOL has been developed and tested with Java version 17. The best way to install Java is to unpack the Java zip in a folder without spaces in the folder name, e.g., C:\app\jdk17. Make sure to add Java to the current 'Path' (on Windows-10 or Windows-11 go to Windows Settings - System - About and click 'Advanced Systems Settings' on the right. Click 'Environment Variables' in the 'Systems Properties' screen. Edit the 'Path' entry and add C:\app\jdk17\bin as an entry (adapt for your chosen location). You can move the entry to before 'C:\Windows\system32' to override a Java client in Windows. Add or modify an entry JAVA_HOME and set the value to C:\app\jdk17 (adapt for your chosen location). You can test whether Java works by opening a Command prompt (CMD) and typing java -version. If Java responds with with version 17, the installation has succeeded.
For MacOS, install OpenJDK version 17, e.g., using the following instruction: https://stackoverflow.com/questions/69875335/macos-how-to-install-java-17 or https://docs.oracle.com/en/java/javase/17/install/installation-jdk-macos.html or https://www.codejava.net/java-core/install-openjdk-17-on-macos.
For Debian / Ubuntu versions of Linux, use the command sudo apt install openjdk-17-jdk to install OpenJDK version 17. For
CentOS / RedHat versions of Linux, use the command sudo yum install java-17-openjdk-devel or sudo dnf install java-17-openjdk-devel to install OpenJDK version 17. If you want to know which java installations are available on CentOS / RedHat, type: yum search jdk or dnf search jdk, and choose the one you want to install.
Creating a new project in Eclipse
After installation of Java and Eclipse, everything should be ready to go. Start Eclipse, and create a new Workspace, which you can use to create many different projects and models within those projects. Eclipse works as follows:
* Eclipse can handle multiple workspaces. A workspace is a logical collection of projects that belong together. Possibly, these projects use common resources or settings. Often, simulation users have only one workspace, sometimes with several projects. Workspace names can be lowercase only, or a combination of lowercase and upper case. Do not use spaces in the name.
* A workspace consists of multiple projects. A project is a total set of Java classes that belong together. Projects can be 'packaged' into an executable Jar file (a jar file is a zip file with Java contents; jar stands for Java ARchive). Usually, an Eclipse project is related to a "real" project for which simulation code is being developed. Project names can be lowercase only, or a combination of lowercase and upper case. Spaces are not allowed.
* A project contains packages. Each package has a logical name, using a reverse URL-structure. Most of the DSOL package names start with "nl.tudelft.simulation.dsol". As a good habit, don't use the so-called 'default package', which is a package without a name. Packages contain Java classes that belong together. Typically, package names are lowercase only. Spaces are not allowed in the name.
* A package contains Java classes. Each Java class is contained in its own file, with ".java" as the extension. The class name is the same (including case) as the filename without extension. Typically, CamelCase is used for the class names. An example of a class name is TutorialExample12 which would be contained in a file with the name TutorialExample12.java. Class names cannot have spaces.
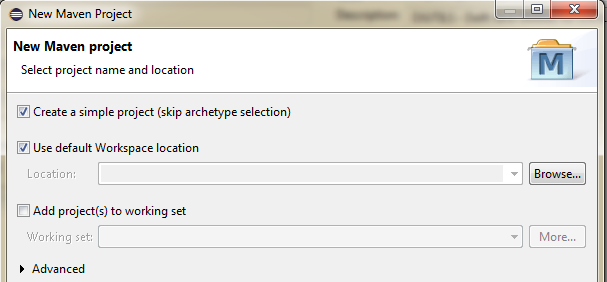
In order to get started, create a new Maven project, not a 'normal' Java project. Maven projects can be created by using 'File' - 'New' - 'Other' - 'Maven' - 'Maven Project'. Type 'Next>'. Select: 'Create a simple project':
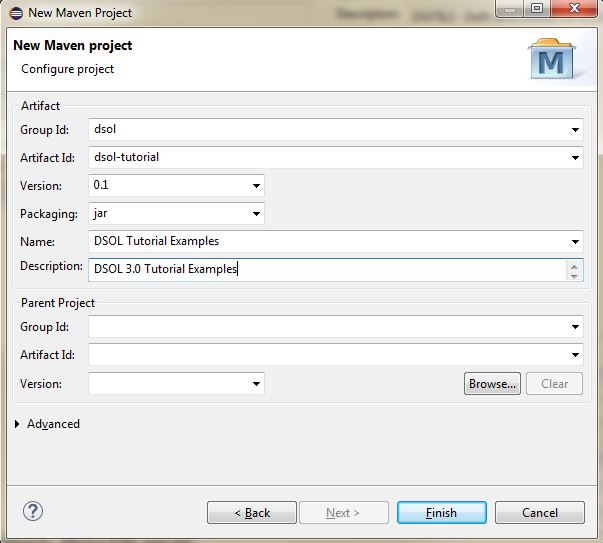
A Maven project name consists of three classifiers:
* a group id, which is an identifier of a group of projects that belong together, e.g. within an organization (the group id could be nl.tudelft or nl.tudelft.tbm.ba or nl.tudelft.simulation), or within a logical group of projects (the group id could be simulation or dsol or tudelft-hospital). Choose a logical name that 'binds' the group of projects within the workspace you are using.
* a artifact id, which is an identifier of the current project, e.g., dsol-tutorial.
* a version number, usually dot-coded numericals, e.g., major.minor (0.1 or 12.08) or major-minor-update (03.01.01; this is the coding that dsol uses).
In addition, give a clear name and description to the project:
After pressing "Finish", the project and its default structure will be created. The default project structure contains four major folders:
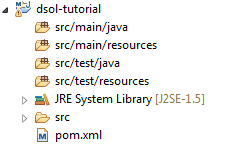
- src/main/java where the packages and classes within the packages are placed;
- src/main/resources where the other files (XML, properties, pictures, etc.) that are not Java code are placed;
- src/test/java where the test code (if any) is placed; test code such as unit tests take care of guarding the integrity of the code in src/main/java;
- src/test/resources where the resources for the test code are placed; test code and resources are not copied into executable jar files.
In this case, the JRE System Library indicates that version 5 of Java is used for compilation (the J2SE-1.5 in green in the above picture). This is the wrong version of Java, as DSOL is dependent on Java version 17 or higher. Therefore, we have to tell Eclipse (or Maven) that we want to use compliance with Java version 17. This can be done in two ways.
Including the Java version in the POM-file
The first (and preferred) way how to do this is to double click on the pom.xml file in the Package Explorer in Eclipse. The Overview screen of the pom-file opens. Open 'properties' and click 'Create...'. Add a property with the name jdk.version and value: 17:
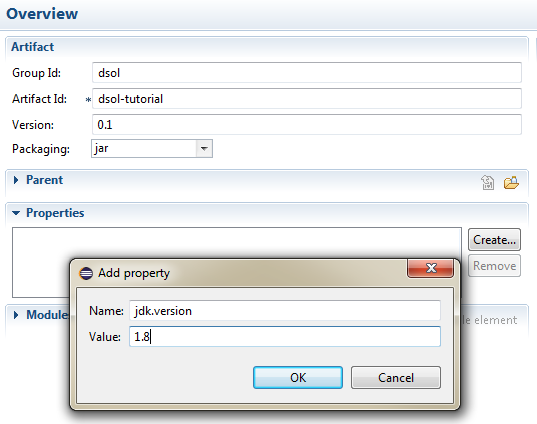
Similarly, add a property maven.compiler.source with value 17, and a property maven.compiler.target with value 17. The properties should now look as follows:

Save the pom-file (by pressing Ctrl/S, or by selecting the 'Save' icon in the top toolbar, or by selecting the 'File' menu and using 'Save'). Then right-click on the project name (in this case: dsol-tutorial), select 'Maven', Update Project, and click 'Ok'. The version should be updated to JavaSE-1.8.
Instead of editing the properties in the Overview screen, they can be typed directly into the pom.xml. Select the 'pom.xml' tab from the right bottom tabs, and under the exisiting information about the project (here copied for reference), the properties (the 5 lines before </project>) can be added:
<project xmlns="http://maven.apache.org/POM/4.0.0" xmlns:xsi="http://www.w3.org/2001/XMLSchema-instance"
  xsi:schemaLocation="http://maven.apache.org/POM/4.0.0 http://maven.apache.org/xsd/maven-4.0.0.xsd">
  <modelVersion>4.0.0</modelVersion>

  <groupId>dsol</groupId>
  <artifactId>dsol-tutorial</artifactId>
  <version>0.1</version>
  <name>DSOL Tutorial Examples</name>
  <description>DSOL Tutorial Examples</description>

  <properties>
    <jdk.version>17</jdk.version>
    <maven.compiler.source>17</maven.compiler.source>
    <maven.compiler.target>17</maven.compiler.target>
  </properties>
</project>
Save the pom.xml file. Right-click on the project name in the Package Explorer at the left of the screen, select 'Maven', Update Project, and click 'Ok'. The version should be updated to JavaSE-17.
Change the Java build path in Eclipse
The second way how to change this is to right-click the JRE System Library entry in the Eclipse Package Explorer. Select 'Build Path - Configure Build Path'. Click on the JRE System Library in the tab 'Libraries':
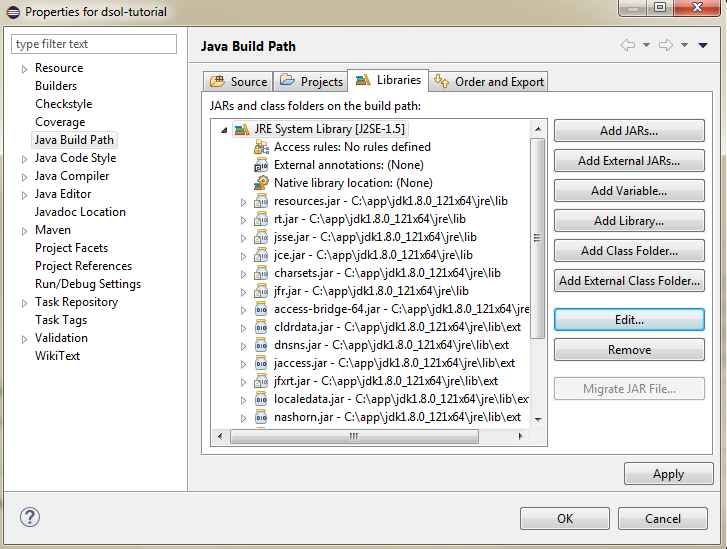
Click 'Edit', and select the Workspace default JRE:
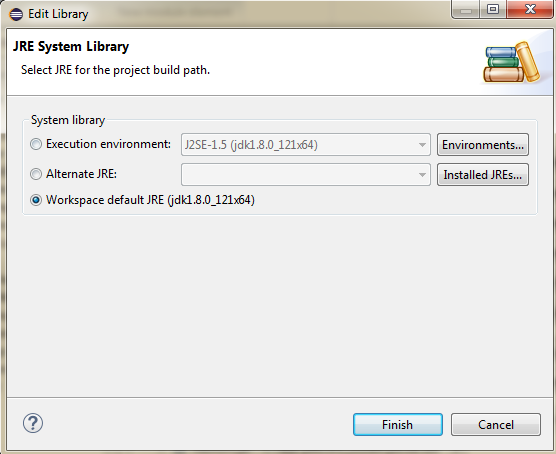
Click 'Finish' to save the changes. Note that when Maven does an update, it is possible that the default Java version is changed back to version 1.5 instead of 17 (or higher). Therefore, the first method where the changes were made in the pom.xml file, is preferred.
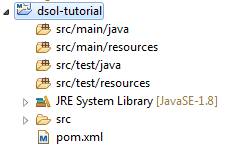
Result: Java 17 used
In either case, the JRE System Library should now be correct:
Working with the DSOL Java code itself
If you want to check out and study or enhance the DSOL Java code itself, take the following steps: 1. Install an SVN client in Eclipse 2. (Optional) Add Checkstyle to Eclipse 3. Check out the DSOL code from SVN
1. Install an SVN client in Eclipse
Warning
Outdated: will be updated to github checkout
Currently the code is stored in SVN (the DSOL project will be moved to Git in 2021). An SVN client has to be present in Eclipse to do the checkout of the code. Go to the Eclipse marketplace, and search for "SVN" (press "Go" to search). Scroll down until you see Subclipse, and press "Install". Select all features and Confirm:

Accept the license agreement and confirm installation of unsigned software (select "Install anyway"). Restart Eclipse when asked.

2. (Optional) Add Checkstyle to Eclipse
Checkstyle is a code checker for the styles that are used in the DSOL code. It provides information, warnings, and errors for code style violations. In order to install this plugin, go to the Eclipse Marketplace via the Help menu, and search for checkstyle. Install the checkstyle plugin:
 Click "Install anyway",and restart Eclipse when asked.
3. Check out the DSOL code from SVN
Warning
Outdated: will be updated to github checkout
Create a perspective in Eclipse to be able to browse SVN repositories. Go to the top right of the screen, and click on the plus-sign (add perspective) that is visible there:

Select the 'SVN Repository browsing' perspective:

The SVN repository browsing perspective will be opened. You can go back to the Java perspective at any time by clicking the 'J' con next to the '+' icon at the top right. In order to open the DSOL-3 repository, click with your right mouse button in the 'SVN repositories' part of the screen and select 'New Repository location' (or click the 'Add SVN Repository' icon in the SVN repositories bar -- the icon has the text 'SVN' and a plus sign):

The SVN repository for DSOL-3 is at https://svn.tbm.tudelft.nl/DSOL3 - fill that in the new Repository Location screen:

The repository will be added, and you can click open the 'trunk', which contains the latest version (which could be unstable), or 'release' which contains all stable released versions until now. If you want to work with the version under development, select and open the 'trunk'. If you want to work with the latest stable version, select 'releases' and open the release you want (typically the latest):

Select the following dsol (sub)projects: dsol, dsol-animation, dsol-animation-gis, dsol-base, dsol-build-tools, dsol-core, dsol-demo, dsol-interpreter, dsol-introspection, dsol-naming, dsol-swing, and dsol-web. Press right mouse button and checkout:

Confirm the following dialog:

And return to the Java perspective (square J icon at the top right of the screen), and the projects will be there:

You can find the source of the main dsol simulation classses in the project 'dsol-core' under /src/main/java.
Warning
In case there is a problem with one of the projects (red icon on the project in the Package Explorer try to fix it with right mouse button on the project - Maven - Update Project. Often, any problems regarding dependencies, wrong folder structures, or otherwise, will be solved that way.
You can now create a project in the same workspace that links to the Java code that was just downloaded from SVN.